Saturday, February 26, 2011

{Local Talent} The Decorated Cookie

Once again, I'm completely amazed by, and really excited to introduce, another Northern VA/DC Metro local talent. Cookie lovers (and admirers), meet Washington, DC's Meaghan Mountford and the decorated cookie. Meaghan is a stay-at home mom AND a writer, cookie decorator, and designer of cookie kits. After working for almost a decade as head decorator for a cookie shop, Meaghan wrote her first book called Cookie Sensations and is currently working on her second. Her cookies have appeared in "The Washington Post," "Modern Bride," "The New York Times," and "Chocolatier Magazine." Meaghan also has an amazing blog called the decorated cookie. Man, and I thought that I was busy!

The decorated cookie is as informative as it is eye-pleasing, highlighting Meaghan's decorated cookies, painted marshmallows, and other crafty sweets. It includes fabulous pictures of Meaghan's work as well as step-by-step instructions, recipes, supply resources, and tips. Here is a sampling of her work (starting with my personal favorite!):


Pretty AMAZING, right? Stop by and visit the decorated cookie...you won't be disappointed!

Side Note: I am so excited to announce that Meaghan has agreed to do a guest post feature for Sheek Shindigs this spring. Hooray! I can't wait to see what she comes up with. Stayed tuned ...

Friday, February 25, 2011

Feeling Green...?

With just 3 weeks away until St. Patrick's Day, I thought that I would throw a little GREEN Etsy inspiration your way.


Sources (starting with upper left and going clockwise):
1. My Bohemian Summer 2. Petek Design 3. Cookie Capers 4. GFetti

Thursday, February 24, 2011

A Crafty Way To Teach Tabletop Basics

I am loving this fun, crafty idea from Better Homes and Gardens on how to help teach your children the Basics of Setting the Table. With some colorful construction paper, glue, and a little time, you can create these cheery place mats as a guide for your child when helping get the table set for a meal. Not only does it teach your child a valuable skill (YES, properly setting a table can be a skill!), but it allows them to have an active part in creating your family meal AND it takes one item off Mommy's "To Do" list. Fab-U-lous!


To create this fun guide, cut construction paper into the shapes of standard dinner essentials(fork, knife, spoon, plate, glass, and napkin), glue in place onto place mat-sized paper, and laminate the finished product at a local copy center.

AND, to make your crafting life a even easier, I found a super cute Place-Setting template from the one and only Martha Stewart. So, if you aren't up to creating your own dinner essentials out of construction paper, you can simply download this adorable place-setting template, print onto card stock, and complete as described above.

Wednesday, February 23, 2011

{Party Ideas} Host an Oscar-Viewing Bash!

Here's a fun party idea: If you love watching the Oscars, make an event out of it! Host the most sought-after Oscar-Viewing Party in your neighborhood! With only a few more days until the big night, here are some fun ideas, recipes, and tools to help get your party ready for the red carpet.

A fabulous table setting will set the "stage" for your Oscar-Viewing Bash. Food Network offers the clever idea of turning paper napkins into Oscar envelopes by using a gold seal, red ribbon and a little folding.


Next, serve your guests Devilled Eggs with Caviar and Red Carpet Stunners to really get the pre-party started. Don't forget to give your beverage glasses sugar-studded rims!


Set up a Concessions Bar for your guests, allowing them to help themselves to jumbo packs of candy, old-fashioned sodas and mini bottles of bubbly once the show begins.


Pass out these Oscar winning ballots for your guests to fill out. At the end of the night, see who correctly predicted the most wins.


End the night on a SWEET note by re-creating the famous "Hollywood" sign. Simply use cupcakes and toothpick letters, a little creativity, and the help of Food Network.


Happy Viewing!

This week's {Local} GIVEAWAY Winner...

Congratulations to this week's GIVEAWAY Winner, ANNE! I hope that you enjoy your cupcakes from HAPPY Cupcake To Go!

Tuesday, February 22, 2011

Last Chance to Enter This Week's {local} GIVEAWAY!

Don't miss out on your chance to win 4 dozen mini cupcakes from HAPPY Cupcake To Go. Today is your last chance to enter to win!

Monday, February 21, 2011

A Bouncing Baby Boy's 1st Birthday Celebration

Sheek Shindigs recently had the privilege of designing a birthday celebration for a special little boy, Sam, who was turning 1. Like many little boys, Sam loves balls! After considering several other options, Sam's mother and I decided that a Ball Theme would be perfect for Sam's 1st Birthday Party Celebration.

The invitations for Sam's party were designed by Kerri of Sent With Love Designs. Kerri did a great job designing these custom invitations based on the theme and colors of the party.


Balls were Incorporated throughout the party's decor as well as bright colors and pictures of the birthday boy's first year.


The kids food table included boxed lunches for each child (personalized with their first initial), personalized water bottles, cookies, cupcakes, and a special cake for the birthday boy. I made a ball "garland" as part of the table's backdrop to go along with the theme of the party as well as a gum"ball"-decorated number 1 to top the birthday boy's cake (which was made by Sam's mommy).


The personalized lunch boxes


The cupcakes were made by HAPPY Cupcake To Go ...


And the cookies were made by Cakes by Mary Ann.


Each family was given a jar of gumballs as a party favor to take home. The favor tags, made by Sheek Shindigs, read "Thanks for Bouncing Over!".


I hope that Sam enjoyed his first birthday celebration. I had a BALL designing it and felt so lucky to be a part of it!

Friday, February 18, 2011

{Sneak Peek} A 1st Birthday Celebration

Sheek Shindigs recently designed a 1st Birthday Celebration for a special little boy. The party is this weekend and I can't wait to share the details and pictures with you next week. Until then, here is a tiny little peek.


Any guesses on what the theme is?
Enjoy your weekend!

Thursday, February 17, 2011

{Real Parties} Night Owl Party

Get ready to HOOT and Holler (as my Grandma used to say) ....this is a good one! Talk about an amazingly talented woman! Anj of Snowy Bliss created this adorable Night Owl Party for her daughter's 6th birthday.


Not only did Anj design this fabulous party, but she made everything for the party as well. Yep, the amazing invitations, table "headboards", cake, party favors...she did it all!

Anj was inspired by another owl party that she had seen featured on Hostess with the Mostess and wanted the party room to look like a bedroom. Using white cardboard, black markers, and an exacto knife, Anj went to work to transform her table into a bed, complete with headboards and pillows. Impressive, right!


I love the hanging owls...


And the cake...it just keeps getting better and better!

After eating pizza, the girls were sent on a really cool scavenger-type hunt (read about it here) that eventually ended with each one getting their own special owl to be adopted (handmade by Anj, of course!) along with these cute naming certificates. I can only imagine the excitement.


What an amazing party. Anj, can we please, please be friends! Thanks for satisfying my "party craving" for today. To see more of this party and other creations by Anj, visit Snowy Bliss, here.

{I hear that Anj is going to be a regular contributor on one of my favorite blogs, Love the Day. Can't wait to see what these two will come up with!}

Tuesday, February 15, 2011

HAPPY Cupcake to Go {Local} GIVEAWAY!

If you follow regularly, you know that I absolutley LOVE finding local talent that I can share with my followers to help them make their Shindigs as fabulous as possible. Today's featured business will do just that! Let me introduce you to Northern Virginia's newest Cupcake Shop "on wheels":


"HAPPY Cupcake To Go is a full service cupcake shop "on wheels", where the creativity is put in to the customers' hands and the convenience is unmatched! With HAPPY Cupcake To Go, you have the option of choosing delectable cupcakes from a vast array of irresistible flavors or you have the ability to be creative and customize mini cakes for your special event or occasion. From simple and sweet, to layered and filled, or piped and topped; the ideas are endless. To top it off, all cupcake orders will be delivered right to your, or your recipient's, doorstep". What an amazing idea, right? One less thing to have to run out and pick up the next time you are planning or hosting an event. Talk about convenience!

Owner, Kristin Idle, knows first hand the pleasure of convenience. With a family that is always on the go, years of experience in project planning and marketing, a love for baking, a knack for detail and style, and a sweet tooth that won't quit!, starting a business that meshed all these qualities into one seemed natural... and so became HAPPY Cupcake To Go!


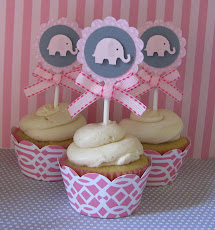
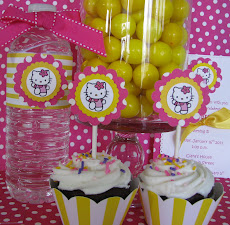
HAPPY Cupake To Go offers a heavenly variety of "standard" cupcake flavors as well as a Seasonal Happy Dozen and Mini Cupcake options. All cupcakes are baked fresh on the day of your order, using only the finest ingredients to ensure that the quality of each cupcake is unmatched. Here is a little glimpse at some of the yummies that HAPPY Cupcake To Go offers:


HAPPY Cupcake To Go is sponsoring this week's local GIVEAWAY! If you live in Fairfax, Loudoun, & Prince William Counties (VA), you are eligible to win a GIFT CERTIFICATE from HAPPY Cupcake To Go for 4 Dozen Mini Cupcakes and FREE Delivery! (Gift certificate is valid until 6/30/2011 and is limited up to 2 cupcake flavors)

This GIVEAWAY will be open until from now until Tuesday, February 21st at 11:59pm. One random winner will be chosen and anounced on February 22nd, 2011. To enter to win:

Become a follower of the Sheek Shindigs blog (if you aren't already) and...

1. Visit the HAPPY Cupcake to Go website, here, and leave a comment back at this post with your favorite flavor(s)

2. "Like" Sheek Shindigs on Facebook and leave a comment that you did so here

3. Follow HAPPY Cupcake To Go on Facebook and leave a comment that you did so here

4. Post about this Giveaway on your Facebook page (with a link) and leave a comment here letting us know that you did so

** You may have a total of 4 enteries to win!! **

Good Luck!!

Friday, February 11, 2011

A Valentine's Heart Day Celebration

I love planning parties for my children and their friends. With Valentine's Day just a few days away, I decided to design a Valentine's Heart Day Celebration for my youngest two to share with a few of their friends. I used the traditional Valentine's color scheme of red, pink, and white along with the traditional heart elements and tried to give it my own SHEEK twist. I created a pom pom backdrop for the favor table and another for "artwork" behind the food table. Hearts were sprinkled throught the decor, along with a little happiness and LOVE!

Here is the favor table. I made a pom pom backdrop to add LOTS of color. A small white tree held hearts filled with valentine's beads for the kids to make a Valentine's necklace. The favor bags held a special treat for each child to take home.


The food table also featured a white tree with hearts as well as a felt heart adorning each chair, heart place settings, heart drink stirrers, chocolate-covered pretzels, individual mailboxes for each child to personalize, and another favor bag for each child.


These Chocolate-covered pretzels are super easy to make. Here's how it did it.


Happy Valentine's Day to you and all of your Sweeties!

Thursday, February 10, 2011

{Sneak Peek} Valentine's Heart Celebration

Here's a quick little peek at the Valentine's Heart Celebration that I designed. Stay tuned...more to come soon!

{Valentine's Day} I DIG You, Valentine!

How cute would these be for a preschool Valentine's Day party! With spring right around the corner (I hope!) these would be great for little ones to stash away for a warmer day after they are finished with their Valentine's treats.


Here are the instructions provided by Family Fun:

To make, you will need:

Small bag of candy
Twist tie
Ribbon
Toy sand shovel
Paint pen

Instructions:

Close a small bag of candy with a twist tie. With a ribbon, tie it to the handle of a toy sand shovel. Use a paint pen or permanent marker to write your message at the base of the shovel, just below the candy bag.

Wednesday, February 9, 2011

Easy Valentine's Treats (NO BAKING REQUIRED!)

Don't have a ton of time to get your bake on this Valentine's? Here are a few EASY and FAST Valentine's Treats that are sure to satisfy your little ones and their friends without requiring too much time from you. That's right, NO BAKING REQUIRED. Here's what you will need for all three recipes:

  • Pre-made Rice Krispie Treat Snacks (You could make these yourself but I just used the store-bought, pre-packaged ones)
  • Milk or Dark Chocolate and Colored Chocolate (I used red, pink, and white)
  • Small Pretzels
  • Sprinkles
  • Lollipop Sticks
  • Wooden Popsicle Sticks

Rice Krispie Treat Heart Pops


These heart pops would be great as cupcake toppers or just wrapped up as a Valentine's treat. To make, take pre-made Rice Krispie Treats and flatten them out to about half their original thickness. Next, take a small heart cookie cutter to cut out heart shapes. Insert a small lollipop stick into each heart and dip into colored chocolate (I used red. Pink would be cute, too). Let extra chocolate drip off and then set on wax paper and refrigerate for a few minutes until chocolate hardens. ** If you wanted to embelish your heart with sprinkles, you would do this before you place them in the refrigerator *

Chocolate-Covered Rice Krispie Treat "Popsicles"


The perfect "popsicle" for the month of February! These chocolate-covered Rice Krispie treats are almost effortless to make. Simply take a pre-made Rice Krispie Treat and insert a wooden popsicle stick into one end. Next, dip the entire Krispie Treat into a deep bowl of melted chocolate. Tap off excess chocolate and place onto a cookie sheet covered with wax paper. Sprinkle with your favorite Valentine's sprinkles and refrigerate until chocolate hardens.

Chocolate-Covered Valentine's Pretzels

Everyone loves a little sweet and salty. These chocolate-covered valentine's pretzels will satisfy AND are super easy to make. To make, simply dip pretzels into melted chocolate (I used white chocolate but you could use milk, dark or colored). Tap off excess chocolate and place on wax paper. Drizzle pretzels with melted colored chocolate and/or decorate with sprinkles. Place in the refrigerator until chocolate has hardened.


I hope that you and your sweeties enjoy!